Page 2 of 4
Re: BF1942 Debugger Multifunctionality Tutorial
Posted: Sat Dec 12, 2009 4:30 pm
by Poow
Re: BF1942 Debugger Multifunctionality Tutorial
Posted: Sat Dec 12, 2009 5:55 pm
by Senshi
Yeah, nice one

. Shouldn't be a biggie creating samples now, right? The prog seems pretty straightforward.
Re: BF1942 Debugger Multifunctionality Tutorial
Posted: Sat Dec 12, 2009 7:08 pm
by Poow
I had no time to test it, but it looks good!
Strange sthing:I can't find any sample for DC in standardmesh in the bf42 root folder. But making lightmaps for dc works good.
However, I will test it tomorrow.
Re: BF1942 Debugger Multifunctionality Tutorial
Posted: Mon Dec 14, 2009 12:06 pm
by Poow
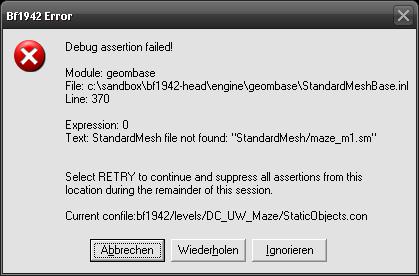
I've made the sample files for my custom models & copied all to:
C:\Programme\EA GAMES\Battlefield 1942\StandardMesh
But I still get the
error for all
my custom objects.
But not for the custom DC objects! Where are the DC samples? And where do I have to copy my samples at?
After using all short cuts from the first post there are only Lightmaps for 5 Objects in the "ObjectLightmaps" folder

(27 Files for 5 different Objects.) But I have 145 objects on my map...
I really don't know what's wrong!
Re: BF1942 Debugger Multifunctionality Tutorial
Posted: Tue Dec 15, 2009 1:25 am
by Apache Thunder
Must of DC's statics (if not all of them) are located in the buildings folder in the standardMesh folder.
You MUST recreate the folder structure with the sample files if the SM file for the aformentioned objects are not in the root standardMesh location. Thus, you can't just drop all the samples to the standardMesh folder. They must mirror the paths that the objects use to load the SM files from.

Example. Your mod have buildings in StandardMesh/Buildings. So your samples go to StandardMesh/buildings in your game's root.
The paths must be mirrored with the sample files. If you have a map that loads it's own objects, then it gets more complicated. In that case you would have to recreate the folder path to your level and put your sample files there instead of the main standardMesh file, but I think you only have to do this if you use the debugger to lightmap or if the map's geometry templates path to the level instead of the SM folder. (which you don't need to do! You can just path all your custom object geometries to StandardMesh/etc and not all the way to your level location! Unless you made a geometry that replaces an existing one.
)
If you use the debugger, the logs will tell you where it expected the sample files to be.
If you your getting missing geometries errors (when infact they appear properly ingame), then chances are your using the debugger to lightmap. So in which case your geometry templates must either path to your level standardMesh location (which would then require you to mirror that path with the sample files) or simply mirror the path for the debugger and drop both the sample files and a copy of your SM files to the mirrored path so that the debugger can load the geometries. Unlike the retail game, the debugger doesn't automatically look in your level's standardMesh folder when ti can't find a geometry that your geometry template calls for. So the path would have then be corrected for the debugger. I think since that error box shows that it expected the SM files to be in the standardMesh folder, then you can just copy all your custom object SM files to the standardMesh folder where your sample files are. The debugger would then beable to load the SM files.
Re: BF1942 Debugger Multifunctionality Tutorial
Posted: Sun Nov 18, 2012 12:15 am
by GoodDayToDie!!
I would love to see a video on all this -.-
Re: BF1942 Debugger Multifunctionality Tutorial
Posted: Sun Nov 18, 2012 5:33 pm
by Senshi
Why? It's all explained detailed in-text, it's super easy and having a video for it doesn't make it easier, as it's simpler to copy&paste the specific shortcuts/batch codes than having to transcribe them...
If you have problems understanding something, ask, and we'll try to help. It is surprisingly difficult to write tutorials that are understandable by guys with all different kinds of backgrounds and experience. You always miss to describe some steps, because you yourself don't even consider them tricky steps anymore. This ranges from the obvious "press the start menu button, then click the "Run" tab there, then enter "notepad", then tap "Return" on your keyboard" stuff to more advanced steps that might not be that common knowledge. Hence: Just ask.
Re: BF1942 Debugger Multifunctionality Tutorial
Posted: Sun Nov 18, 2012 11:55 pm
by GoodDayToDie!!
Senshi wrote:Why?
It is surprisingly difficult to write tutorials that are understandable by guys with all different kinds of backgrounds and experience.
I have found videos easier for me is all. It's okay, I was just saying. Can't imagine fraps-ing the process and tossing it in this thread to be a very arduous ordeal...
Would complement this tutorial if anything...
Cheers
Re: BF1942 Debugger Multifunctionality Tutorial
Posted: Sun Nov 25, 2012 1:06 pm
by reegad
i see lmList.da in the shortcut code, how do you generate this?
Re: BF1942 Debugger Multifunctionality Tutorial
Posted: Sat Jan 05, 2013 1:23 am
by Senshi
Probably because the files listed in the log do not exist for whatever reason
. Both are mandatory to generate lightmaps:
Without static objects, there's nothing to generate object lightmaps for. Without the objectslightmap.con, the shadow generator will not know how to render the shadows.
You can get it auto-generated by using Battlecraft 42 once, alternatively you can just edit the important things yourself. The important ones are described in the "rem" comments.
An objectslightmap.con usually looks like this:
Code: Select all
raytracer.init
raytracer.ambientIntensity 0.05
raytracer.blockSize 16
raytracer.sampleOffset 0.05

rem *** 1 == Trace only the nearest 256x256 meter patch.
rem *** 0 == Trace all patches.
raytracer.OnlyNearest 0

rem *** < 0, trace all pixels
rem *** Else, number of meters from moving free camera to trace the shadows. Preview tool.
raytracer.shadowsNearCamera -10.0

raytracer.light.create
raytracer.light.direction 0.459000/0.475000/-0.750000
raytracer.light.selfshadowing 1
raytracer.light.objectShadows 0
raytracer.light.shadowIntensity 1
raytracer.light.intensity 0.37
raytracer.light.softness 1.0
raytracer.light.fov 130
raytracer.light.viewDistance 200

raytracer.light.create
rem **** Should be sun direction ***
raytracer.light.direction 0.459000/0.475000/-0.750000
raytracer.light.selfshadowing 1
raytracer.light.objectShadows 1
raytracer.light.shadowIntensity 1
raytracer.light.intensity 0.6
raytracer.light.softness 0.0
raytracer.light.fov 8
raytracer.light.viewDistance 500


raytracer.addIgnoreObject terrain
raytracer.addIgnoreObject track